
Analytic Accounting
Analytic accounting helps you track costs and revenues, as well as analyse the profitability of a program, project or service. When creating your journal entries, the cost centre widget allows the distribution of costs in one or more cost centres.
Configuration
Enable the Analytic Accounting feature by going to .
Analytic Accounts
The analytic accounts give an overview of your costs and revenue.
Access your existing analytic accounts by going to . To create a new analytic account, click New, and fill in the required information:
Analytic Account: add the name of your analytic account;
Customer: select the customer related to your project;
Reference: add a reference to make it easier to find the account when you are on your bill;
Plan: add a program(analytic plan);
Company: if you are managing multiple companies, select the company for which the analytic account will be used;
Currency: select the currency of the analytic account;
Then, fill in your budget information.
Programs(Analytic Plans)
The programs(analytic plans) allow you to analyze your accounting. For example, to track costs and revenues by project or department. In Kujabuild they encompass Programs.
You can access the programs(analytic plans) by going to . Click New to create a new plan.
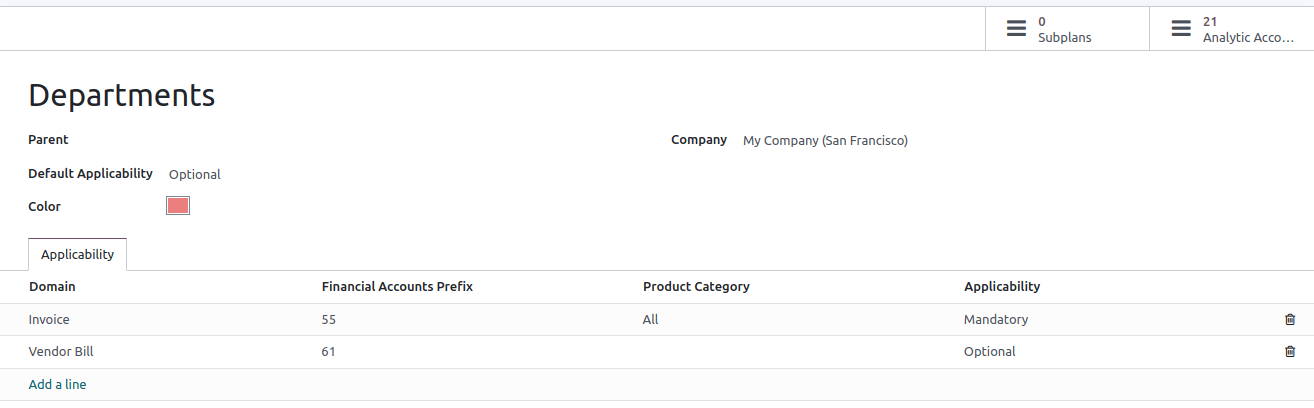
The following information must be completed:
Parent: link your plan to another Analytic Plan to build a hierarchy between your plans;
Default Applicability: decide how your plan behaves in the widget when creating a new journal entry:
Optional: if selected, it is not mandatory to add the analytic plan in the widget;
Mandatory: if selected, an orange bullet is visible in the widget next to the plan until the analytic distribution is done (the bullet then turns to green); it is not possible to confirm the entry if no analytic account is selected;
Unavailable: if selected, the plan is not available in the widget.
Color: select the color of the tag related to this specific plan;
Company: add the company to which the plan applies;
You can also fine-tune your plans’ applicability by filling in the Applicability tab:
Domain: choose to which accounting document your plan applies;
Financial Accounts Prefix: select the prefix of the account(s) to which this plan should be applied;
Product Category: decide to which product category the plan applies;
- Applicability: decide how your plan behaves in the widget when creating a new journal
entry. The applicability you set here always overrides the default applicability.
Two smart buttons are available in the top-right corner:
Subplans: can be created to have a more complex analytic structure. Click the Subplans smart button, and then New to add a subplan;
Analytic Accounts: to reach the analytic accounts related to the plan.
Note
The analytic widget is prefilled based on the applicability, and the Analytic Distribution Models;
Each analytic plan must have at least one analytic account.
Analytic distribution
Add a plan in the Analytic column when creating an invoice or bill. This field is mandatory only if you previously linked your analytic plan to at least one analytic account. After adding the plan, a widget opens where you can fill in the different information. You can add tags to reflect the related analytic accounts and decide how to split the costs between the accounts by modifying the percentage.
